
Take Your Website Live: A Simple Domain Setup Walkthrough With Namecheap, Cloudways, and WordPress.
Are you starting a new business or launching a new project? Then you know that creating a website is a crucial step to establishing your online presence. But if you’re not a tech whiz, the process of setting up a website can be daunting. That’s why this article is here to help! We’ll provide you with all the “Whys” and a complete step-by-step guide to setting up a WordPress website using Namecheap and Cloudways. And don’t worry if you prefer GoDaddy – the process is still the same.
You can jump to the text step-by-steps or watch my video walkthrough if you want to get right into the setup process. The rest of this article gives insight on how to choose a domain registrar and web hosting company if it’s better to set up your own website or hire it out, and explanations of website setup basics.
Let’s get started!
Table of Contents
Video Walkthrough – Website Setup Tutorial on YouTube
Want to learn to set up your domain, server, and WordPress by following along with a YouTube video? This is my exact process that you can follow along with, step by step.
Watch on YouTube
What You Need to Create a Website
Before you start setting up your website, you’ll need a few essential things. Here’s a quick rundown:
Domain name: This is the web address of your website (e.g. www.mybusiness.com). You can purchase a domain name from a domain registrar like Namecheap (Looking for a Namecheap promo code? Check latest offers) or GoDaddy.
Web hosting: This is where your website files will be stored so that people can access them online. You can either set up hosting yourself or use a hosting provider like Cloudways (Get a free trial!).
Website builder: This is the platform you’ll use to build your website. WordPress is a popular website builder that we’ll be using for this tutorial.
Bookkeeping: However you prefer to store receipts, track important information, and set renewal reminders.
That’s it! It’s really simple to start building your website.
Why Namecheap is Better than GoDaddy for Small Business Websites
When it comes to choosing a domain registrar, there are many options to choose from. Namecheap and GoDaddy are two of the most popular domain registrars, but which one is better for small business websites?
In my experience, Namecheap is a better option for small business websites for several reasons:
- Affordability: Namecheap offers domain names at a lower price point than GoDaddy, which can be especially beneficial for small businesses with limited budgets.
- User-friendly interface: Namecheap has a user-friendly interface, which makes it easy to manage your domains and website.
- Better customer support: Namecheap is known for its excellent customer support, which can be helpful if you run into any issues or have questions.
- Free WHOIS privacy: Namecheap offers free WHOIS privacy protection for all of its domains, which can help protect your personal information from being publicly available.
- Less upsells: GoDaddy made me feel like I was jumping through hoops just to purchase a domain for the stated price. I’ve also heard from several clients that they mistakenly paid for a brokering service to try to get a domain, when they believed the price they were paying was a definitive purchase price for the domain. Though GoDaddy does state what the brokering service is, I can understand why user experience is poor.
Overall, we recommend Namecheap over GoDaddy for small business websites, but it’s not that important of a decision.
Check out Namecheap’s current promotions
Should You Set Up Hosting Yourself or Hire Someone?
When it comes to connecting your domain with web hosting, you have two options: set it up yourself or hire someone to do it for you.

Most people think they can’t set up their hosting without hiring someone or paying extra to a domain registrar. However, if you have 20 minutes to spare and can follow step-by-step instructions, you can do it on your own. This can save you money and give you more control over your website.
If you’re not comfortable setting up hosting yourself, you can hire someone to do it for you. Many web developers and hosting providers offer hosting setup services, which can save you time and ensure that your website is set up correctly. However, this can be more expensive than setting up hosting yourself, and it can be a headache to transfer your site in the future.
If you plan to have multiple websites now or in the future, you should forego the “easy” hosting add-on that most domain registrars try to upsell. You’ll want greater control over your server(s), which is best attained by setting it up on your own (budget-friendly!) or hiring dedicated help.
Ultimately, the decision to set up hosting yourself or hire someone will depend on your budget and time constraints. But, the step-by-step guide in this article makes the tech part simple.
Why You Shouldn’t Use The Hosting Solution Offered By Domain Registrars
While Namecheap and GoDaddy offer hosting solutions and other options add-ons, the convenience can quickly become costly and constrained.
Rather than paying a domain registrar to add hosting AND managed WordPress options AND SSL certificates, you can do it all for less cost and greater flexibility with Cloudways.
In my experience, Cloudways makes it the easiest and most economical to set up a server, connect your domains and web applications, and more. Here are some benefits:
- Faster loading speeds: Cloudways uses a content delivery network (CDN) to ensure fast loading speeds for your website. You don’t necessarily know what you’re getting when you use an add-on for your hosting.
- Free WordPress installation: You don’t need to purchase an add-on. Cloudways sets up your WordPress (or WooCommerce) application seamlessly with no additional cost.
- Scalability: Cloudways allows you to easily scale your server up or down depending on your needs, which can be beneficial for businesses that experience spikes in traffic, have seasonal demand, or manage websites for other clients.
- 24/7 customer support: Cloudways offers 24/7 customer support, which can be helpful if you run into any issues or have questions. Their troubleshooting is impeccable and you
- Better security: Cloudways offers built-in firewalls and other security measures to protect your website from hacking and other cyber threats.
- Free SSL installation: Cloudways makes it easy to install an SSL certificate for free, which is important for website security and can also boost your website’s search engine ranking.
While adding hosting through your domain registrar is a simple option, Cloudways offers so much more and is extremely simple to set up. (Try Cloudways free and save 30% with promo code CW30FOR3)

Why use WordPress as your Web Application?
This guide makes it easy to choose WordPress or Magento or WooCommerce as your Web Application. But if you haven’t already decided on what Web Application you want to use and are wondering why so many people use WordPress, here’s some insight.
WordPress is one of the most popular website builders in the world, and for good reason. Here are some of the benefits of using WordPress to build your website:
- Easy to use: WordPress is user-friendly, and you don’t need to be a tech genius to use it.
- Customizable: WordPress offers a wide range of themes and plugins that you can use to customize your website and add new features. It’s easy to create landing pages, set up e-commerce stores, or build niche websites ready for ad display integrations (By the way, GeneratePress is one of my favorite themes for client websites. You can try their free theme and builder, too!)
- SEO-friendly: WordPress is built with SEO in mind, which can help your website rank higher in search engines.
- Mobile-friendly: WordPress themes are designed to be responsive, which means they look great on all devices, including smartphones and tablets.
- Community support: WordPress has a large and active community of users and developers who can provide support and resources. There is a wide array of plugins, themes, and troubleshooting guides available across the web.
Overall, WordPress is a great option for building a website, especially if you’re not a tech expert. With WordPress, you can easily create a professional-looking website that’s both functional and visually appealing.
What To Do After Registering a Domain – Go Live, or Create Content?
Once you’ve registered a domain name, you can either go live right away or publish later.
Going live means your website is immediately visible to the world, and you can start attracting visitors and customers right away. However, it also means any mistakes or changes you make will be immediately visible to visitors. Yikes!
On the other hand, working on content before you tie your domain to your website allows you to test and make changes without your brand name on it. This is great for experimenting with different designs without the pressure of getting it right the first time. However, you could get stuck in this step forever!
In my experience, doing is better than done, and I highly recommend you take your website live right away so you have no excuse to keep working on it.
So, the choice is yours! But whichever you choose, Cloudways makes it really easy to start working on your website application, whether you want to tie it to your domain right away or not.
How to Choose the Best Web Host and Server Size
Choosing a web host and server size is an important decision when setting up your website. Here are some things to consider:
- Budget: How much are you willing to spend on hosting? Different hosts offer different pricing plans, so make sure to choose one that fits your budget.
- Website size and traffic: What kind of website are you building, and how much traffic do you expect? A small personal blog will have different hosting needs than a large e-commerce site.
- Speed and performance: How important is site speed and performance to you and your visitors? Make sure to choose a host that offers fast load times and reliable uptime.
- Support and security: Does the host offer good customer support and security features? You’ll want to choose a host that can help you troubleshoot issues and keep your site safe.
When it comes to server size, it’s important to choose one that can handle your website’s needs without overpaying for resources you don’t need. Cloudways offers a helpful price calculator tool that can help you determine the right size for your server based on your website’s expected traffic and usage.
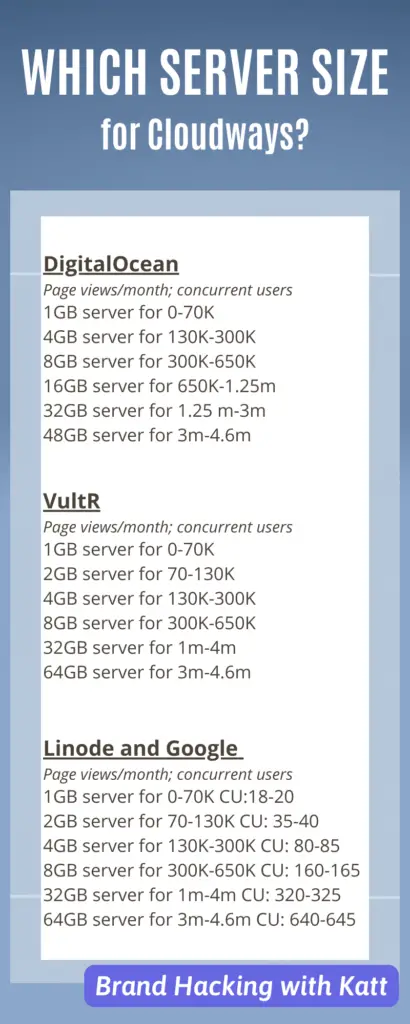
Be sure to look at Cloudways traffic estimates – Don’t overbuy, and remember, it’s easier to scale-up as needed than to scale down!
Interested in Cloudways? Try free and save 30% with promo code CW30FOR3
20-Minute WordPress Website Setup Step-By-Step Guide
If you’re starting a new business, you need a website. Building a website might seem daunting, but it’s easier than you might think. In this step-by-step guide, we’ll show you how to set up a WordPress website using Namecheap and Cloudways. (If you prefer to use WooCommerce, you can follow these steps too. Some steps and navigation may vary slightly, but the general process it the same).
Here’s a simple step-by-step walk-through of the process of setting up a WordPress website using Namecheap and Cloudways:
Promo Codes and Free Trials:
If you’re looking to try-it-before-you-buy-it or wondering if there’s a way to save on a domain or server cost, here are a few promotional offers worth mentioning:
- NameCheap
Save on domain registration and get free privacy protection - Cloudways
Incredibly fast, simple hosting. Try free and save 30% with promo code CW30FOR3 - GeneratePress
One of the most popular WordPress themes. Try their free theme and builder. - Jasper.ai
Claim 10,000 Words Free – Kick the writer’s block and get your website copy and content flowing. - Canva Pro
Try Canva Pro FREE for 30 days – No more searching for stock images or finding out your favorite template is behind a paywall.
I. Domain Registration Steps:
- Go to the NameCheap website (https://www.namecheap.com/).
- In the search bar at the top of the page, enter the desired domain name and select the desired extension (e.g. .com, .net, .org).
- Click the “Search” button to check the availability of the domain.
- If the domain is available for a price you’re ok with and it’s the one you want, click the “Add to Cart” button to proceed with the purchase. If not, try the search again with a different name variation.
- If you already have a NameCheap account, sign in. If you don’t have an account, click the “Create Account” button to create a new account.
- After signing in or creating an account, you’ll be taken to the “Shopping Cart” page. Review the items in your cart and make any necessary changes.
- Namecheap will offer you other add-ons and upsells at this point, such as hosting, SSL, and WordPress management services. We will take care of these steps using Cloudways in the next few lessons, so you do not need to purchase additional items from Namecheap.
- Click the “Continue to Checkout” button to proceed to the checkout page.
- You’ll be prompted to enter your billing and payment information on the checkout page. Enter this information and click the “Continue to Review” button.
- Review your order and make sure everything is correct. If everything looks good, click the “Pay Now” button to complete the purchase.
- Log your expenses, save your receipts, and/or set a reminder ahead of your renewal date!
You can keep Namecheap open. We will use it later in the set-up process when we are ready to connect our domain to our server.
II. Choosing and Purchasing your Server:
- Go to the Cloudways website (https://www.cloudways.com/) and sign in to your account. If you don’t have an account, click the “Sign Up” button to create a new account.
- Click the “Launch Now” button to start the process of creating a new server.
- On the “Select Your Application” page, choose the application you want to install on your server. If you’re following my tech stack, choose WordPress.
- On the “Select Your Plan” page, choose the server size that best meets your needs. You can use the “Price Calculator” to help determine the right size for your server.
- On the “Select Your Cloud Provider” page, choose the data provider you want to use.
III. Connecting your Domain to your Server & Website Application:
At this point, your server may need 5-10 minutes to officially launch. When launch is complete, continue with the following setup:
- Sign in to your domain registrar’s account (e.g. NameCheap, GoDaddy, etc.).
- Go to your domains list (left sidebar on NameCheap).
- Click into the domain you want to manage.
- Find a “Manage” or “DNS” section for your domain. In NameCheap, this will be the “Advanced DNS” tab running along the top of the window.
- Click “Add New Record”
- Select “A Record” from the first dropdown.
- In Host, put “@”
- For the Value field, we need to grab the IP Address of the Cloudways Server.
- On Cloudways, click “Servers” and select your new server.
- Under Server Management, click “Master Credentials.” This should be in the left-hand toolbar.
- Click the “Public IP” to copy it to your clipboard.
- Toggle back to your NameCheap window and
- Paste the IP address in the Value Field.
- For TTL, choose “1 min” or leave it at “automatic.”
- Save the record.
- Add another record by clicking “Add New Record”
- Select “A Record” again
- For Host, put “www” this time.
- For Value, paste the same IP address.
- For TTL, choose “1 min” or leave it at “automatic.
- Save record.
IV. Logging into your WordPress application for the first time:
If you want to take your website live right now, skip this section.
If you want to start adding content through your WordPress application before taking your domain live, here’s how to access your WordPress CMS:
- On your CloudWays dashboard for the server you just created, click the “Applications” tab.
- You will see a section with information about the WordPress application Cloudways set up for you, including a username, password, and your generic WordPress URL. Click the LAUNCH icon to open your WordPress dashboard from this panel.
When you are ready to take your website live, continue to the next section.
V. Adding your Domain to your WordPress application through CloudWays (Taking your site LIVE!):
- In CloudWays, click to “Applications” to enter your Application Management Dashboard.
- Click “Domain Management,” which is located in the lefthand sidebar.
- Click “Add A Domain” and enter your new domain that you purchased from NameCheap (i.e. DomainName.com).
- If you see both your domain name and a generic WordPress URL, click the menu icon next to your URL and choose “Set as Primary Domain”
VI. Setting up your free SSL Certificate:
- Open your Cloudways dashboard
- Navigate to Application Management
- Choose the correct application (This is your WordPress application, but it should now be titled with Your Domain Name)
- In the lefthand sidebar, Click SSL Certificate
- In the dropdown window, choose “Let’s Encrypt”
- Add the Email you used for your WordPress application set-up.
- Enter your domain with or without www. (i.e. yourdomain.xyz)
- Click Save Changes
Congratulations! Your website is now live and ready to be customized and filled with content. Remember that Namecheap and Cloudways offer customer support if you run into any issues along the way.
Troubleshooting Website Setup Issues
Even with a step-by-step guide, website setup can sometimes be a tricky process. Here are some common issues you may encounter and how to troubleshoot them:
403 Errors
This error typically means that the server is blocking access to certain files or folders. To troubleshoot, try the following:
A 403 error on a new website usually indicates that the server is denying access to the requested resource, which can happen for a variety of reasons. Here are some troubleshooting steps to help resolve a 403 error on a new website:
- Double-check your URL: Make sure the URL you’re trying to access is correct and properly formatted. Check for any typos or incorrect characters that may be preventing access.
- Clear your browser cache: Sometimes, a 403 error can be caused by a browser caching issue. Clearing your browser cache can often resolve this problem.
- Disable your firewall: Your firewall may be blocking access to the website. Temporarily disable your firewall to see if that resolves the issue. If it does, you’ll need to add an exception for the website in your firewall settings.
- Contact your web host: If none of the above steps work, contact your web host to see if they can help you resolve the issue. They may need to check the server logs to see what’s causing the error.
“Root domain loads my website, but using “www.” or “http” gives me an error”
If you can access your website using the root domain (e.g. yourdomain.com), but nothing loads when you try to access it with a prefix (e.g. www.yourdomain.com), it could be a DNS issue. Check your DNS settings to make sure you have the appropriate records in place for your domain and subdomains.
“Site not secure” browser warning
If you’re seeing a “Site not secure” warning in your browser, it means that your website doesn’t have a valid SSL certificate installed. This can happen if you didn’t set up SSL during the initial setup process or if there was an error in the SSL setup. Check with your web host to see if they offer a free SSL option, like Let’s Encrypt, or consider purchasing an SSL certificate from a trusted provider. Once your SSL is set up, your website will be more secure and the warning message will disappear.
Connection Issues:
If you’re having trouble connecting your domain to your server, make sure that your DNS records are set up correctly. Double-check that you’ve entered the correct IP address and that your domain registrar and hosting provider are properly connected.
If you’re having trouble resolving any of these issues, don’t hesitate to reach out to customer support for your domain registrar, hosting provider, or WordPress itself. They may be able to help you troubleshoot and fix the issue. Don’t let website setup issues discourage you – with a bit of persistence and troubleshooting, you’ll be able to get your site up and running!
You’ve completed your server and domain setup!
Congratulations! You’ve made it to the end of my step-by-step guide on how to set up a WordPress website using Namecheap and Cloudways.
I hope that you found this guide helpful and that you’re now feeling more confident about creating your own website. Remember, building a website can be a fun and empowering experience, so don’t let the technical aspects scare you off.
As with anything new, there may be some hiccups along the way, but don’t worry – you can always come back to this guide for reference or seek assistance from the support teams at Namecheap or Cloudways.
If you are just reading this guide and haven’t started launching your website yet, I highly recommend using Namecheap as your domain registrar and Cloudways as your web host for all of the reasons referenced in this guide. They are both affordable and offer a great user experience, allowing you to focus on the important part of your website: the content.
So, what are you waiting for? Go out there and start building an amazing website for your business or personal brand. (Psst…You can tell people you’re a tech genius now :))
Want to keep learning? Join our Facebook Group
Explore: Digital Door Knocking Checklist: 25 Action Items for Effective Outreach
